AI Character Sheet Prompt: A Production-Ready Template
You’ve got a character in your head — a wasteland mechanic, a sci-fi netrunner, a dark elf rogue. The image is clear; you just need it on the page as a real reference you can hand to a modeler, drop into a pitch deck, or paste into a Steam page.
Emily (@IamEmily2050) posted a prompt template this week that does exactly that. A structured fill-in form for production-grade character sheets — multi-view, costume-paneled, asymmetry-locked. Paste it in, fill in your character, get a full sheet on the first run. Then take the front view, drop it into the video generator, and you’ve got a moving hero shot.
This walkthrough gives you the template, a filled-in example, the turntable extension, and a four-column shot sheet for scaling beyond a single hero shot to a full multi-shot scene.
Credit where it’s due: the prompt template below is by @IamEmily2050 on X. The walkthrough, fill-in example, and image-to-video extension are ours.
The full template
Paste this into the image generator, fill in the brackets, and run. Don’t trim the prose — the verbose framing is what’s doing the work.
Create a complex UE5 MetaHuman style production character sheet
for the character described below.

Use strict production continuity. The character must remain identical
across all views. Preserve face identity, body proportions, hairstyle,
outfit, accessories, markings, and all asymmetrical left/right details.

Use a technical 3D character-reference layout, not a glamour poster.
Include orthographic style body views, clean studio lighting, neutral
background, panel borders, callout lines, body landmark labels, surface
detail panels, hands/feet reference, hair/groom reference, and costume
detail panels. Left and right are always from the character's perspective.
Never mirror asymmetrical details between views.

Separate neutral body documentation from complex costume documentation.
Use a simple readable base outfit for body measurement panels. Put complex
clothing, armor, asymmetrical garments, props, and accessories into
costume panels.

CHARACTER TYPE:
[human / humanoid / fantasy creature / robot / alien / animal-like / stylized / realistic / other]

CHARACTER SUMMARY:
[short description of the character]

DEMOGRAPHIC BASELINE:
[Insert standing demographic profile here]

AGE / APPARENT AGE:
[age or apparent age]

HEIGHT & BUILD:
[exact or approximate height] | [slim / athletic / average / muscular / heavy / stocky / creature-specific]

PROPORTION STYLE:
[realistic 7–7.5 heads / fashion 8 heads / heroic / chibi / creature-specific / stylized]

FACE & HEAD DESIGN:
[face shape, eyes, nose, lips, jaw, expression baseline] | [hair color, length, texture, bangs, parting, horns, ears, helmet, hood, crest, etc.]

SKIN / SURFACE:
[skin tone, pores, scars, tattoos, makeup, fur, scales, metal, armor surface, etc.]

OUTFIT / ARMOR:
[describe full outfit]

ASYMMETRICAL DETAILS:
[List exact side from character perspective. Example: cutouts on character's left side, scar over character's right eye, tattoo on character's left shoulder.]

ACCESSORIES / PROPS:
[jewelry, weapons, bags, devices, wings, tail, etc.]

REQUIRED VIEWS:
1. Front view
2. 3/4 left view
3. Left profile
4. Back view
5. 3/4 right view
6. Right profile
7. Looking-up view
8. Action pose
9. Body measurement and landmark panel
10. Surface detail close-ups
11. Hands and feet close-ups
12. Hair/groom or head-detail panel
13. Costume/armor/prop detail panel

LABEL & VISUAL STYLE:
[minimal labels / numbered callouts / blank label boxes] | [UE5 MetaHuman-style, realistic render, stylized anime, dark fantasy, sci-fi hard surface, etc.]

IMPORTANT CONTINUITY LOCKS:
[repeat the non-negotiable features here]
The two fields most worth obsessing over are ASYMMETRICAL DETAILS and IMPORTANT CONTINUITY LOCKS. Everything else is description; those two are instructions to the model about what not to drift on.
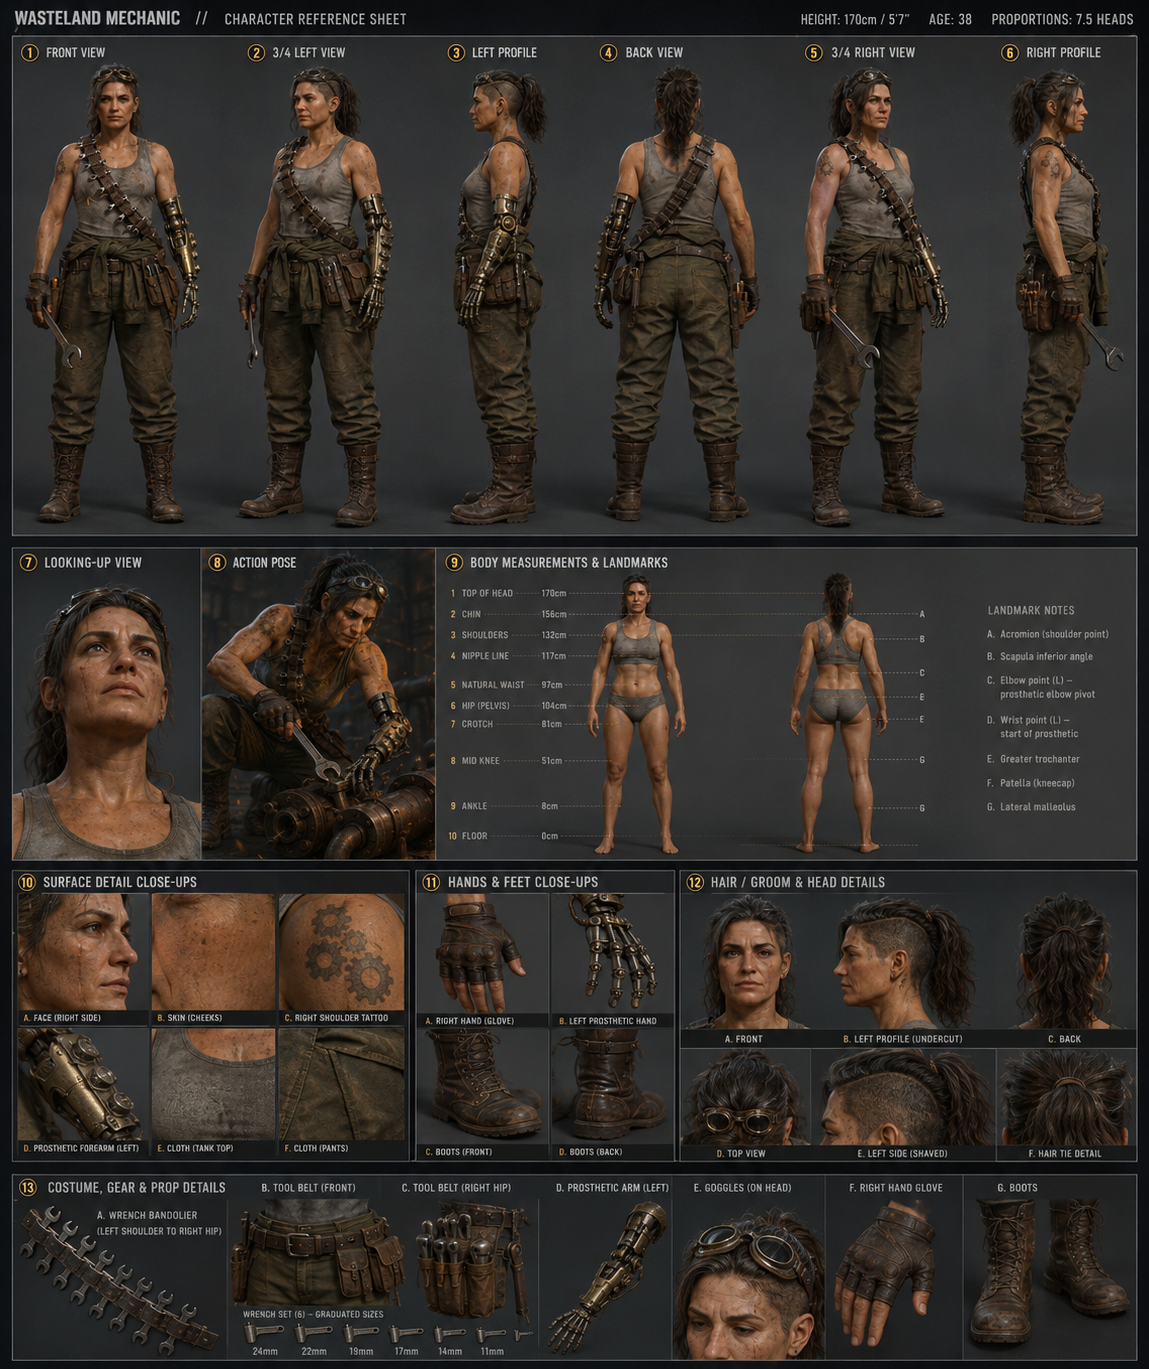
Filled-in example: a wasteland mechanic
To show what a complete fill-in looks like, here’s the template configured for a specific character — a salvage mechanic in a post-apocalyptic survival game. She has enough asymmetric detail to actually test the continuity locks (one prosthetic arm, one scar, one tattoo, one shaved side), which is the whole point of the exercise.
CHARACTER TYPE: human

CHARACTER SUMMARY: A wasteland mechanic in her late 30s. Survived two
factory collapses. Repairs broken machinery for her settlement in
exchange for ration credits. Quietly competent, faintly amused, never
hurried.

DEMOGRAPHIC BASELINE: Standing, weight on right leg, shoulders relaxed,
left arm slightly forward as if holding a wrench, neutral expression
with the corner of her mouth lifted.

AGE / APPARENT AGE: 38, looks 41 from sun damage and stress.

HEIGHT & BUILD: 5'7" / 170cm | athletic-stocky, broad shoulders, strong
forearms, low body fat from rationing.

PROPORTION STYLE: realistic 7.5 heads.

FACE & HEAD DESIGN: Square jaw, high cheekbones, deep-set hazel-brown
eyes, broken nose healed slightly off-center, thin scar from right
eyebrow to right cheekbone (avoiding the eye). Hair dark brown with
grey streaks, undercut on the LEFT side (shaved to 3mm), the rest
shoulder-length and tied back loose. No bangs.

SKIN / SURFACE: Sun-weathered tan, freckles across nose and cheeks,
oil stains under fingernails, faint grease smudge across right
forearm.

OUTFIT / ARMOR: Heavy canvas mechanic's jumpsuit in faded olive,
rolled to the waist with the sleeves tied around her hips. Underneath,
a sweat-stained grey tank top. Scuffed brown leather work boots,
laced high. A thick utility belt with multiple pouches and a
cross-body wrench bandolier.

ASYMMETRICAL DETAILS:
- Prosthetic LEFT arm from elbow down: brass and steel, exposed
  pistons at the wrist, three knurled adjustment dials on the forearm.
  The fingers are articulated steel, slightly tarnished.
- Scar on the RIGHT side of the face only, eyebrow to cheekbone.
- Tattoo of three interlocked gear teeth on the RIGHT shoulder
  (visible on the tank top).
- Wrench bandolier crosses over the LEFT shoulder, hangs to the
  RIGHT hip.
- Undercut shaved on the LEFT side of the head only.

ACCESSORIES / PROPS: Leather utility belt, wrench bandolier with
six wrenches in graduated sizes, a goggles-on-headband pushed up
into the hairline, a small canvas tool roll on the right hip,
fingerless leather glove on the right hand only.

LABEL & VISUAL STYLE: numbered callouts | UE5 MetaHuman-style
realistic render with grounded cinematic lighting.

IMPORTANT CONTINUITY LOCKS:
- Prosthetic is the LEFT arm. Always. Never the right.
- Scar is on the RIGHT side of the face only.
- Undercut is on the LEFT side of the head only.
- Glove is on the RIGHT hand only.
- Tattoo is on the RIGHT shoulder only.
- Wrench bandolier: LEFT shoulder to RIGHT hip.
Three rules of thumb when you fill yours in:
- Pick a side and stick to it. Half the failure modes come from being vague about which side the asymmetric thing is on. “Left side” beats “one side.” “From the character’s perspective” beats nothing.
- Repeat the load-bearing details. If the prosthetic arm is the headline of the design, it should appear in OUTFIT, ASYMMETRICAL DETAILS, and CONTINUITY LOCKS. Three mentions is the floor, not the ceiling.
- Describe the personality, not just the physique. “Quietly competent, faintly amused, never hurried” gives the model a posture and an expression baseline — the difference between a generic survival NPC and a specific person.
The character sheet at the top of this page is the actual output from pasting that exact fill-in into the image generator on the first run. Every required view is there — front, 3/4, profiles, back, looking-up, action pose, body measurement, surface details, hands and feet, hair and groom, costume panel. Continuity holds across most views: prosthetic on the left arm, scar on the right of the face, undercut on the left of the head, bandolier from left shoulder to right hip.
If your first run misses one of those locks (a side flip, a costume drift, the panels collapsing into a single hero render), re-roll once or twice. Repetition in the CONTINUITY LOCKS block is what eventually pins it.
Step two: turn the hero view into a 5-second turntable
A static sheet is the reference. A short looping clip of the character is what actually goes in a pitch deck or a Steam page hero block. Take the front-view crop from your character sheet, drop it into the video generator with this prompt:
Camera slowly orbits the subject 30 degrees clockwise around a fixed
vertical axis. Subject remains stationary. Hair and loose clothing
have subtle physical movement. Lighting stays consistent. No facial
expression change. 5 seconds. Loopable.
This clip is the front view from the sheet above, that exact prompt, and nothing else. Four seconds, looping, no facial performance, no costume drift. Drop it straight into a pitch deck or a Steam page hero block.
Step three: scale to a multi-shot scene
A single turntable is a hero shot. For an actual sequence — establishing wide, character beat, close-up, action beat — you need a shot list, not one prompt.
Glitter Gal (@GlitterPixely) has been sharing a four-column shot-sheet format that works for AI video the same way a storyboard works for live action: one row per shot, four prompts per row.
The columns:
| Storyboard / shot | Visual description prompt | Camera angle / movement | SFX / music prompt |
|---|---|---|---|
| What this shot shows | Subject, costume, environment, action, mood — and the continuity locks repeated | Lens, angle, framing, movement | Diegetic SFX + ambient + music bed |
The workflow per row is two passes — same image-to-video pipeline you used for the turntable, run once per shot:
- Image gen. Paste column 2 (visual description) plus column 3’s framing/angle into the image generator. You get back a still frame for that shot.
- Image-to-video. Feed that still into the video generator along with column 3’s camera-movement instruction. You get back the animated shot.
- Audio gen. Run column 4 through an audio generator separately for SFX and the music bed.
Three generations per row, one finished shot out the other end. Sequence the shots in order in any editor (CapCut, Premiere, even iMovie) and that’s the scene.
The trick is that every row’s visual description prompt repeats the character’s identity, costume, and the key continuity locks — otherwise the still frames drift between shots, and once the still drifts, the image-to-video step inherits the drift. The shot list is structured repetition, which is exactly what image and video models reward.
Here’s the wasteland mechanic across a four-shot workshop scene:
| Storyboard / shot | Visual description prompt | Camera angle / movement | SFX / music prompt |
|---|---|---|---|
| 1. Establishing wide of the workshop | Wasteland mechanic, late 30s, prosthetic LEFT arm in brass and steel, scar on RIGHT cheek, undercut on LEFT, olive jumpsuit rolled to waist over grey tank, wrench bandolier crossing left shoulder to right hip. Standing at a workbench in a cluttered post-apocalyptic garage, golden afternoon light through dusty windows. | Static wide, slow push-in over 3 seconds, eye-level. | Low generator hum, distant wind, sparse industrial drone. No music yet. |
| 2. Character beat at the bench | Same mechanic. Same costume. Prosthetic LEFT, scar RIGHT, undercut LEFT. Leaning over the bench, picking up a wrench with her steel-finger prosthetic. Same warm dusty afternoon light. | Medium shot from her right side, slow handheld drift, slight low angle. | Metallic clink of the wrench, fabric shift of the jumpsuit, faint mechanical clicks from her prosthetic. |
| 3. Close-up on the prosthetic | Prosthetic LEFT arm fills the frame: brass and steel, knurled adjustment dials on the forearm, articulated steel fingers slightly tarnished, oil under the nails. The wrench rotates in her grip. Bench blurred behind in shallow depth of field. | Macro close-up, slight rotation around the forearm, two-second hold. | Sharp metallic ratchet click, tighter mechanical sounds, low industrial pad starting underneath. |
| 4. Action beat — she throws the wrench | Same mechanic, full-body, mid-throw with the prosthetic LEFT arm. Jumpsuit and bandolier in motion. Late afternoon light catches the wrench in the air. Same workshop background. | Tracking medium shot, follows the throw left to right, snap-cut on impact. | Whoosh of the throw, satisfying metallic THUNK on impact, music bed swells with a single low industrial hit. |
Stitch four 5-second clips like this in order and you’ve got a 20-second character intro that reads as a coherent scene instead of four disconnected hero shots. The continuity comes from the visual description column — every row writes the prosthetic on the LEFT, the scar on the RIGHT, the undercut on the LEFT. Repetition is the feature, not the redundancy.
The audio column matters more than people expect. AI video gen on its own outputs silence; running each row’s SFX/music prompt through a separate audio gen pass (or a single bed plus per-shot SFX) gives you a finished sequence rather than a silent demo reel. Treat audio as a first-class prompt, not a post-production afterthought.
Where this fits in a real pipeline
A good character sheet is upstream of almost everything else in a small studio’s art pipeline. With the static reference plus the turntable clip in hand, the next steps line up cleanly:
- Pre-vis and cinematic blocking. Drop the turntable into your pitch deck or trailer rough cut as a moving hero shot.
- Modeler’s reference. Hand the sheet to a 3D modeler — yourself or contracted — as the brief. The orthographic-style views are exactly what they want.
- Texture and surface notes. The surface detail panel from the sheet is your starting point for a substance painter pass. Photograph or screen-grab the close-ups and use them as reference layers.
- Game-ready iteration. Once a base mesh exists, regenerate the sheet with the same prompt every time you change a costume detail. The asymmetry locks make it easy to keep the iterations consistent.
The point isn’t to replace a concept artist. It’s to give a solo dev or a two-person team a real production reference in 30 minutes instead of 3 weeks of moodboarding, so the actual modeling and animation work can start.
Try the template yourself
Take Emily’s prompt, paste it in, fill in the brackets for whatever character you’ve been sketching in a notebook for six months. The whole point of the structured format is that it works for anything — fantasy, sci-fi, post-apocalyptic, stylized, creature, robot. Give it your weirdest design idea and see whether the continuity locks hold.
If the sheet looks right, take the front view, drop it into the video generator with the camera-orbit prompt, and you’ve got a moving hero shot of your character before lunch.